Introduction
Website: raspberrypi.org
Models
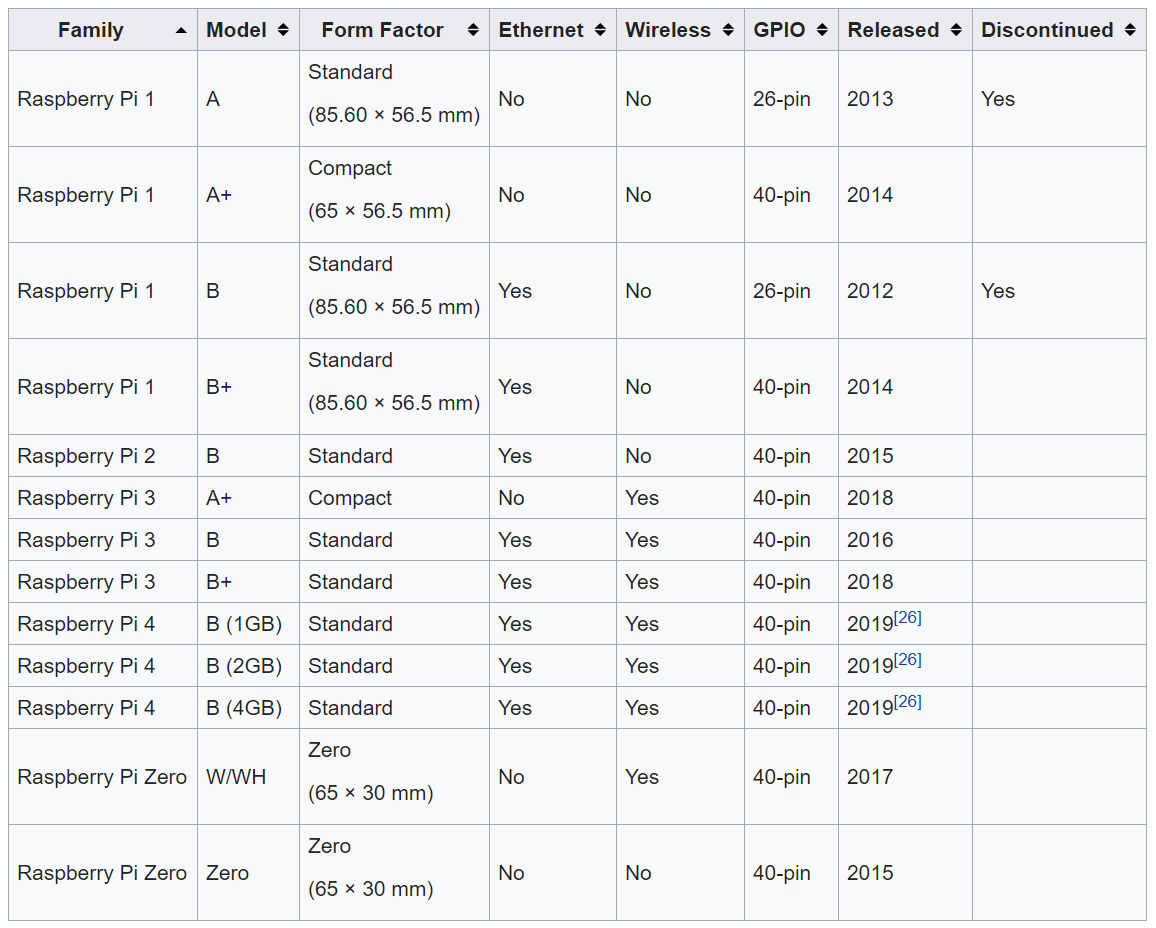
| Pi Model | RAM | Processor | Video |
|---|---|---|---|
| 4 | 1,2&4GB LPDDR4 SDRAM | 1.5GHz 64-bit quad-core ARM Cortex-A72 BCM2711 (ARMv8) | Brcm VideoCore VI multimedia/3D graphics |
| 3 B+ | 1GB LPDDR2 SDRAM | 1.4GHz 64-bit quad-core ARM Cortex-A53 BCM2837B0 (ARMv7) | Brcm VideoCore IV multimedia/3D graphics |
| Zero Wireless | 512MB RAM | 1.0GHz 32-bit single-core ARM1176JZF BCM2835 (ARMv6) | Brcm VideoCore IV 1080p30 |
| CM 3 Lite | 1GB LPDDR2 SDRAM | 1.2GHz 64-bit quad-core ARM Cortex-A53 BCM2837BO (ARMv7) | none |
| CM 3+ | 8,16,32GB LPDDR2 SDRAM | 1.2GHz 64-bit quad-core ARM Cortex-A53 BCM2837BO (ARMv7) | none |
Quick way to identify the model on RPi
cat /sys/firmware/devicetree/base/model
Output:
Raspberry Pi 3 Model B Plus Rev 1.3
To identify CPU hardware model and revision
cat /proc/cpuinfo
Output:
processor       : 0
model name      : ARMv7 Processor rev 4 (v7l)
BogoMIPS        : 38.40
Features        : half thumb fastmult vfp edsp neon vfpv3 tls vfpv4 idiva idivt vfpd32 lpae evtstrm crc32
CPU implementer : 0x41
CPU architecture: 7
CPU variant     : 0x0
CPU part        : 0xd03
CPU revision    : 4

processor       : 1
model name      : ARMv7 Processor rev 4 (v7l)
BogoMIPS        : 38.40
Features        : half thumb fastmult vfp edsp neon vfpv3 tls vfpv4 idiva idivt vfpd32 lpae evtstrm crc32
CPU implementer : 0x41
CPU architecture: 7
CPU variant     : 0x0
CPU part        : 0xd03
CPU revision    : 4

processor       : 2
model name      : ARMv7 Processor rev 4 (v7l)
BogoMIPS        : 38.40
Features        : half thumb fastmult vfp edsp neon vfpv3 tls vfpv4 idiva idivt vfpd32 lpae evtstrm crc32
CPU implementer : 0x41
CPU architecture: 7
CPU variant     : 0x0
CPU part        : 0xd03
CPU revision    : 4

processor       : 3
model name      : ARMv7 Processor rev 4 (v7l)
BogoMIPS        : 38.40
Features        : half thumb fastmult vfp edsp neon vfpv3 tls vfpv4 idiva idivt vfpd32 lpae evtstrm crc32
CPU implementer : 0x41
CPU architecture: 7
CPU variant     : 0x0
CPU part        : 0xd03
CPU revision    : 4

Hardware        : BCM2835
Revision        : a020d3
Serial          : 00000000e5337702
Model           : Raspberry Pi 3 Model B Plus Rev 1.3
Pin Layout & GPIO
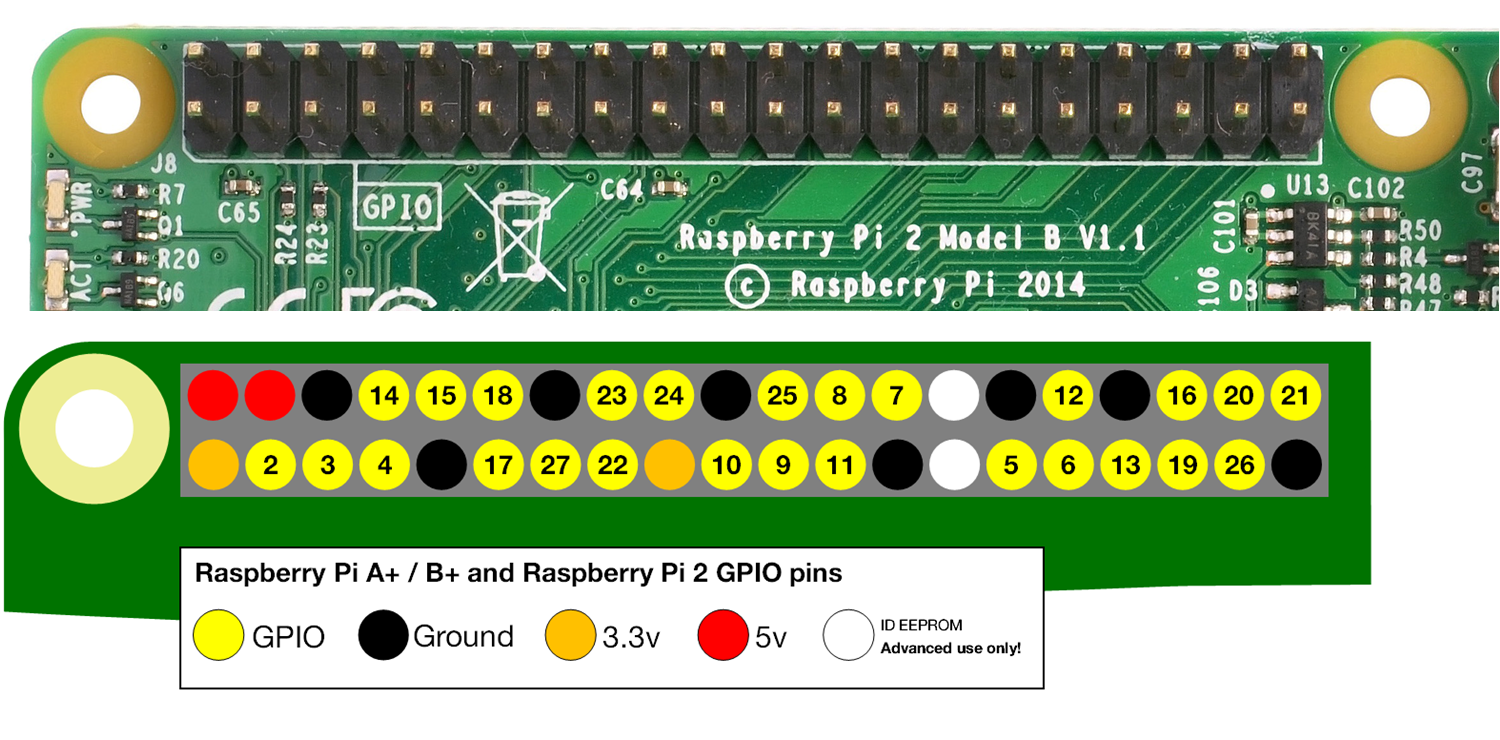
The pin layout can also be displayed on the running RPi by opening the terminal and issue:
pinout
Output:
'--------------------------------.
| oooooooooooooooooooo J8     +====
| 1ooooooooooooooooooo  PoE   | USB
|  Wi                    oo   +====
|  Fi  Pi Model 3B+ V1.3 oo      |
|        '----.               +====
| |D|    |SoC |               | USB
| |S|    |    |               +====
| |I|    '----'                  |
|                   |C|     +======
|                   |S|     |   Net
| pwr        |HDMI| |I||A|  +======
'-| |--------|    |----|V|-------'

Revision           : a020d3
SoC                : BCM2837
RAM                : 1024Mb
Storage            : MicroSD
USB ports          : 4 (excluding power)
Ethernet ports     : 1
Wi-fi              : True
Bluetooth          : True
Camera ports (CSI) : 1
Display ports (DSI): 1

J8:
   3V3  (1) (2)  5V
 GPIO2  (3) (4)  5V
 GPIO3  (5) (6)  GND
 GPIO4  (7) (8)  GPIO14
   GND  (9) (10) GPIO15
GPIO17 (11) (12) GPIO18
GPIO27 (13) (14) GND
GPIO22 (15) (16) GPIO23
   3V3 (17) (18) GPIO24
GPIO10 (19) (20) GND
 GPIO9 (21) (22) GPIO25
GPIO11 (23) (24) GPIO8
   GND (25) (26) GPIO7
 GPIO0 (27) (28) GPIO1
 GPIO5 (29) (30) GND
 GPIO6 (31) (32) GPIO12
GPIO13 (33) (34) GND
GPIO19 (35) (36) GPIO16
GPIO26 (37) (38) GPIO20
   GND (39) (40) GPIO21

For further information, please refer to https://pinout.xyz/
Also checkout the web-based interactive pinout diagram, go to https://pinout.xyz/
In addition to IO, the GPIO pins are used for a variety of functions, such as: PWM (pulse-width modulation), SPI, I2C and Serial. See raspberrypi.org - GPIO for more details.
Power Up
RPi does not have BIOS. Diagnostic during booting will be based solely on the various LEDs on the board. For all models of RPi:
- LED1: Green (labeled ACT) means SD card is connected
- LED2: Red (labeled PWR) means getting 3.3 V power, and should remain on
During booting sequence, the LED2 will flicker on then off, pause a moment, then pulse on and offf again as the boot code read off the SD card.
How to fix Raspberry Pi boot problems provides more details about the booting LEDs on/off sequences.
Because lack of BIOS, the system configuration parameters that would normally
be kept and set using the BIOS are now stored in a text file named config.txt.
The config.txt file is read by the GPU before the ARM core is initialized.
The config.txt file is an optional file on the boot partition and it can be
found in /boot/config.txt.
See RPiconfig for details.
Installation Raspbian OS
Download the Raspbian OS binary
The raspberrypi.com Download page provides download for Raspbian OS and links to other OSes such as: Windows 10 IoT Core, OSMC, Mozilla Web Thing, etc.
The latest version of Raspbian can be found here. The older versions can be found on the download archive
There are three packages to choose from depending on usage, and they varies in size:
- Raspbian Buster with desktop and recommended software
- Raspbian Buster with desktop
- Raspbian Buster Lite;
The Lite version is suitable for server or most edge devices that does not need access to UI during operation but access using headless mode.
Instructions:
- Download the Raspbian OS ZIP file to a computer from Raspberry Pi download;
Prepare Raspbian OS
Two types of media for storing the OS image are discussed below:
- the default raspberry microSD card
- external USB Flash drive or SSD
Writing the OS image to microSD card
Notes:
- Choosing the size of microSD card:
-
For SD card up to 32 GB, flashing to SD card can be easily done using Etcher as discussed below. Source
-
For SD card of 64GB or larger, also known as SDXC card, it needs to be formatted with the exFAT filesystem. Please refer to SDXC formatting for more detailed discussion.
-
- balenaEtcher is the recommended tool to write OS image, for its ease of use.
Instructions:
-
The quick checklist is as follow:
- If not already, download the latest version of balenaEtcher and install it.
- Insert the SD card to the SD card reader; most laptops has built in reader
- Run balenaEtcher and follow four steps below:
- Select the downloaded zip file OS image from the laptop hard drive
- Select the SD card you wish to write your image to
-
Review & review again the selections
Warning: Please ENSURE the selected SD drive is the intended drive. Special caution especially when you have more than one drive. The next step will wipe out all the existing data in the drive and irreversible! - Once you are confident, Click
Flash!to start writing OS files to the SD card
- Flashing takes a while. Once complete, the boot drive may not be visible
on Windows 10 laptop until the SD card is ejected & re-inserted.
The boot drive should be visible on, for example
D:drive or other, depending on the drive setup on the laptop. - Next, proceed with Preboot Setup
Writing the OS image to USB Flash drive or SSD
USB mass storage boot is available out of the box on Raspberry Pi 2B v1.2, 3A+, 3B, and 3B+ only. Support for RPi 4B in will be available in future software update (Per Nov 2019). Note: an extra step is needed for RPi 3A+ and 3B only to enable USB host boot mode, by setting the USB host boot mode bit in the OTP (one-time programmable) memory.
Instructions:
- TBD
Source: USB mass storage boot
Pre-boot Setup
The OS media can be provisioned prior to starting the first boot on the RPi. The pre-boot setup is to do away with the need for RPi to be connected to monitor and keyboard during the first boot process, and RPi will be ready in headless mode after bootup.
Headless mode means RPi can be access remotely
from another computer using ssh but it requires the “ssh server” and “wifi”
to be enabled on RPi.
Pre-boot setup is commonly done on the raspbian lite OS
because it does not have the desktop UI installed, and it is typically not
connected to keyboard or monitor, and accessed from remote computer using ssh.
This is a typical edge devices setup. The preboot setup involves creating
new file or modifying existing file on the boot drive.
The content of the boot drive will be copied to the OS folder during
first boot process.
Instructions - Windows:
-
The following instructions are to be performed on the computer or laptop
-
Open file explorer, make sure the boot drive is visible; for example,
D:drive or other depending on the computer drive setup. If the boot drive is not visible, ejected & re-inserted the microSD card. Otherwise, the microSD card may not be flashed properly. - Enabled wifi network - create a blank file named
wpa_supplicant.confin boot drive. This file enables the OS to connect to the specified wireless network.-
Open command prompt in Admin mode, run the following command, which creates a blank wpa_supplicant.conf in the
bootdriveWarning: the following command assumes the microSD card is connected as drive letter EC:\>fsutil file createnew E:\wpa_supplicant.conf 0Note: the file can also be created directly from File Explorer; or copy existing file to the microSD card. -
open text editor and add the following to wpa_supplicant.conf file
country=US
ctrl_interface=DIR=/var/run/wpa_supplicant GROUP=netdev
update_config=1
network={
  ssid="<wifiSSID>"
  psk="<wifiPassword>"
  key_mgmt=WPA-PSK
}
replace
<wifiSSID>and<wifiPassword>with values from the target wifi. Depending on the country & wifi router type, adjustcountry=USandkey_mgmt=WPA-PSKaccordingly.
-
- Enabled SSH connection to RPi from other computer after first boot to
perform additional configurations or administration tasks, or application
setup.
-
For Windows, in the same command prompt, run the following command, which creates a blank file named
sshin thebootdrive.Warning: the following command assumes the microSD card is connected as drive letter EC:\>fsutil file createnew E:\ssh 0
-
- Configure GPU memory allocation as follows:
- if running Raspbian desktop OS, skip this step
- if running Raspbian desktop OS with Pi Camera attached, see the next step
for how to allocate
gpu_mem - if running Raspbian lite OS, the
gpu_memallocation can be set to the lowest or 16 MB
- Enable Pi Camera [Optional] - edit
config.txtfile and add the following lines:start_x=1 gpu_mem=128 disable_camera_led=1- need at 128 MB GPU memory
- optional, to turn-off the led while camera in use, set to
disable_camera_led=1 - Next proceed to the first boot
- See RPiconfig for details.
First boot on Raspberry Pi
Instructions:
-
Perform the following instructions on the raspberry pi
- Insert the SD card into the Rapsberry Pi and start the first boot process
- For RPi with connected monitor, mouse and keyboard, proceed to login using the UI
- For headless RPi, not connected to monitor, mouse and keyboard, use SSH client software, such as putty, to connect to RPi, as discussed next below.
- [Optional] SSH connection to headless RPi. Since the RPi is headless,
there is no visual way to know if the booting process is complete.
Luckily, the raspbian OS has been pre-configured by default with the
hostname equals to
raspberrypi, and the raspbian buster OS comes with preinstalled Multicast Domain Name Service (mDNS) calledavahi-daemo. Therefore, you should be able topingorsshthe host using the hostname. A reply to thepingindicates the boot process has completed and ready forsshconnectionping raspberrypiOutput:
Pinging raspberrypi.attlocal.net [192.168.1.105] with 32 bytes of data: Reply from 192.168.1.105: bytes=32 time=5ms TTL=64 Reply from 192.168.1.105: bytes=32 time=5ms TTL=64 Reply from 192.168.1.105: bytes=32 time=5ms TTL=64 Reply from 192.168.1.105: bytes=32 time=6ms TTL=64 Ping statistics for 192.168.1.105: Packets: Sent = 4, Received = 4, Lost = 0 (0% loss), Approximate round trip times in milli-seconds: Minimum = 5ms, Maximum = 6ms, Average = 5ms - Login using the default (userid, password) = (pi, raspberry)
and start post-configure RPi using the
sudo raspi-configincluding: change password, setup country, language, timezone, keyboard.
Headless Install - Finding the IP address
When installing Raspbian OS on RPI using headless setup, meaning RPi is not connected to external monitor and keyboard but it has been preconfigured with wifi setup and SSH, the IP address needs to be identified for making the SSH connection.
- TBD
Raspbian OS version
Check on device raspbian os version
uname --all
Output:
Linux raspberrypi 4.19.75-v7+ #1270 SMP Tue Sep 24 18:45:11 BST 2019 armv7l GNU/Linux
Note:
- 4.19 corresponds to Debian 10 (Buster);
- part of 4.9 & 4.14 corresponds to Debian 9 (Stretch)
Source: Raspbian
Setup
Change hostname
The hostname should be letters ‘a’ to ‘z’ (upper or lower), digits ‘0’ to ‘9’, and the dash ‘-‘.
Reboot is needed.
Instructions - RPi:
- From the terminal, change the
hostnamein the/etc/hostnamefile; the file contains one line only, and it’s the hostname.sudo nano /etc/hostname # change to the intended hostname - [Alternative] Change using raspi-config; select “Hostname” from the menu.
Set a static IP address
Instructions - RPi:
- Configure
/etc/dhcpcd.confsudo nano /etc/dhcpcd.conf - Enter the following information, but adjust values to thee corresponding
environment
profile static_eth0
static ip_address=192.168.1.100/24
static routers=192.168.1.254
static domain_name_servers=192.168.1.254
Note:
routersis the address of the gateway, see above.domain_name_serversis the DNS address(es) from/etc/resolv.conf- Also see
man dhcpcd.conf
Generate SSH Keys and Transfer to remote host
Create cryptographic SSH private/public keys to SSH connect to RPi without entering username and password.
Instructions - Windows:
- On the Windows computer, generate the SSH keys
cd /Users/<username>/.ssh # create the .ssh folder if it does not exist ssh-keygen -t rsa - Choose no passphrase when asked and accept the default filename of
id_rsa. This creates both the id_rsa private key file and public key file. Keep the private key on the safe place, and copy the public key to the host to be connected to, i.e., RPi.cd /Users/<username>/.ssh dir id_rsa.pub - Copy the public key to RPi using WinSCP as described here
- After WinSCP login to RPi, the left column shows the folders on the local Windows host; the right column shows the folders on the remote host, RPi.
- On the local host (left column), navigate to the
/Users/<username>/.ssh; the public key,id_rsa.pub, should be visible - On the RPi host (right column), navigate to
~/.ssh - drag the file from left to right
- after successful copy, rename the file,
id_rsa.pub, toauthorized_keys; - if the
authorized_keysfile already exists then need to append the content ofid_rsa.pub, toauthorized_keysby right clicking each file to open it using the built-in editor, and copy & paste the content. - Note: on the debian linux host, the key can be copied directly from the
local to remote host using:
ssh-copy-id pi@raspberrypi.local
- Now, SSH client (putty) and SCP client (WinSCP) can be setup to connect without using username/password
Source:
Increase Swap Space
Increasing swap space is commonly done prior to compilation of native code, such as C/C++, to prevent compilation hanging due to out of memory especially in the multi-core complation setup.
Instructions:
- Swap file is defined in
/etc/dphys-swapfile; edit theCONF_SWAPSIZEvariable in this file:# default value #CONF_SWAPSIZE=100 # increase to 1024MB or 2048MB, for example CONF_SWAPSIZE=1024 - Restart the service
sudo /etc/init.d/dphys-swapfile stop sudo /etc/init.d/dphys-swapfile start - Now ready for memory intensive task such as multi-core compilation;
# running four cores
make -j4

# running single core
make
Source: How to change Raspbian swapfile size
Mount USB Drive
Tasks related to mounting USB drive include:
- format the drive
- mount the drive
- unmount
Ref: https://www.raspberrypi.org/documentation/configuration/external-storage.md
Format USB drive
Instructions:
- Identify which device is the USB stick by removing it (if it is plugged in)
and then reconnect it. This will generate some messages about the device in
the system messages file. View the last few lines to identify your device.
The USB device will be named something like sda, sdd, etc.cat /var/log/messages | tail -n 50Unnless there are other usb drives, it should be
/dev/sda - RPi will automatically mount USB drive
cd /media ls -al usbdisk - Check the partition on the USB disk using
fdiskcommandsudo fdisk /dev/sdaOutput:
Welcome to fdisk (util-linux 2.33.1). Changes will remain in memory only, until you decide to write them. Be careful before using the write command. Command (m for help): - Enter
pto see all the partitions that already existDisk /dev/sda: 57.9 GiB, 62176362496 bytes, 121438208 sectors Disk model: Ultra Fit Units: sectors of 1 * 512 = 512 bytes Sector size (logical/physical): 512 bytes / 512 bytes I/O size (minimum/optimal): 512 bytes / 512 bytes Disklabel type: dos Disk identifier: 0x00000000 Device Boot Start End Sectors Size Id Type /dev/sda1 21952 121438207 121416256 57.9G c W95 FAT32 (LBA) Command (m for help): - Delete all the partitions by entering
dSelected partition 1 Partition 1 has been deleted. Command (m for help): - Create new partition and use the USB drive as a single partition
by typing
nand follow the output below:Partition type p primary (0 primary, 0 extended, 4 free) e extended (container for logical partitions) Select (default p):- press
enterto accept “p” as primary, and the output:Partition number (1-4, default 1): - press
enterto accept single partition, and the output:First sector (2048-121438207, default 2048): - press
enterto accept the default 2048, and the output:Last sector, +/-sectors or +/-size{K,M,G,T,P} (2048-121438207, default 121438207): - press
enterto accept the default121438207, and the output:Created a new partition 1 of type 'Linux' and of size 57.9 GiB. Command (m for help): - enter
wto write the new partition table andexitfdisk
- press
-
Create a filesystem using the
mkfscommand- Note:
vfatfile system enable to use the USB drive on a PC or a Mac too, BUT cannot change permission once mountedext4is a new filesystem that has become the defacto standard of most Linux distros todayext3is just ext2 with journal
- There is one partition, so must put the partition number to the end of the
device name:
sudo mkfs.ext4 /dev/sda1 -
To be clean, physically eject the drive and then re-insert it
- Next mount the drive as described below
- Note:
Source:
Formatting and Mounting a USB Drive from a Terminal Window
Mount USB flash drive
Raspbian OS will auto-mount USB flash drive soon after it is plugged-in.
It will be mounted on /media/<??>.
To change to a different mount point Instructions:
- create a mount point
sudo mkdir /media/usbdisk - make
pithe owner and group if not alreadysudo chown -R pi:pi /media/usbdisk - mount the usb drive to
/media/usbdiskmount pointsudo mount /dev/sda1 /media/usbdisk -o uid=pi,gid=pi
Setup to auto-mount after reboot
The mount point will not persist after reboot so auto-mount needs to be setup.
- find the UUID for sda1, if the first usb
ls -l /dev/disk/by-uuid/Example output with the
UUID=0116-FA8D:total 0 lrwxrwxrwx 1 root root 10 Nov 18 13:49 0116-FA8D -> ../../sda1 lrwxrwxrwx 1 root root 15 Nov 18 13:49 0C61-73F5 -> ../../mmcblk0p1 lrwxrwxrwx 1 root root 15 Nov 18 13:49 43f2d0bb-83be-464f-94d0-9a751f376c64 -> ../../mmcblk0p2 - edit
/etc/fstabsudo nano /etc/fstab # add at the end UUID=0116-FA8D /media/usbdisk vfat auto,nofail,noatime,users,rw,uid=pi,gid=pi 0 0Note:
- Use UUID rather than the device node (
/dev/sda1) as the device node can change across reboots especially if drives are added or removed. - Include “nofail” in the mount options to prevent the Pi hanging if it is booted without the drive attached.
- Use UUID rather than the device node (
Unmount USB Drive
sudo umount /media/usbdisk
Additional References
- Adding an External Disk to a Raspberry Pi and Sharing it Over the Network covers how to share the mounted disk across network using protocols: NFS, AFS, and SMB.
Statup Script
Startup scripts perform auto start of: command, application or services after
boot. This is useful for powering up RPi headless and without additional user
intervention. Headless RPi is access using ssh.
There are three mechanisms to invoke startup scripts after boot:
-
rc.local
rc.localhas drawbacks: not all programs will run reliably, because not all services may be available when rc.local runs. Stretch and Buster use systemd. -
systemd this is a system service that can be start/stop enable/disable from the linux prompt. For more information: systemd,
man systemctl, What is an init System -
cron Cron is a tool for configuring scheduled tasks on linux systems. It is used to schedule commands or scripts to run periodically and at fixed intervals. Tasks range from backing up the user’s home folders every day at midnight, to logging CPU information every hour.
Example
Assume there is a python script, push_hold_shut.py, in the home directory.
sudo nano /etc/rc.local
# add the program
~/push_hold_shut.py &
Install Touchscreen Keyboard - Matchbox
Prerequisite:
-
Raspbian desktop image (not lite)
- Install
sudo apt-get update sudo apt-get dist-upgrade sudo apt-get install --no-install-recommends matchbox-keyboard - The keyboard can be started from Menu > Accesories > Keyboard
Source: Matchbox Keyboard - Raspberry Pi Touchscreen Keyboard
Backup Raspbian microSD
RPI OS runs on microSD card which has a shorter lifetime than, for example,
physical hard drive. Therefore, backing up the entire microSD card to a file
(.img file) is highly recommended to prevent failure at the least desired
time, like in a middle of critical half-finished project.
For Windows, use Win32DiskImager
Source: Win32DiskImager
Connect to RPi
SSH using Putty and PuttyGen Key Generator
Putty is a free SSH client that can be downloaded from here
Instructions:
- Start putty; the main screen is the “PuTTY Configuration” window.
- Enter “Host Name (or IP address)”
- Click SSH radio button for “Connection type”
- Use default Port=22
- Enter a session name to save the configuration
- [Optional] setup SSH key for connection without username/password
- Click Connection - Data; enter “Auto-login username” with the username to
login to RPi; for example,
pi - Click Connection - SSH - Auth, on the “Private key file for authentication”
browse to find the private key in the putty ppk format. Otherwise,
jump to the next step to convert the OpenSSH private key (
id_rsa) to putty ppk format using the PuttyGen application. - To save, click Session, then click Save to save the setup into the session config file for later reuse.
- Click Connection - Data; enter “Auto-login username” with the username to
login to RPi; for example,
- [Optional] Convert the private key,
id_rsato puttyppkformat; both the ssh client (putty) and the scp client (WinSCP) that we will use later to connect to headless RPi need the puttyppkformat.- as part of putty ssh client installation, the “puttyGen” key generator is also installed; use the puttygen to convert the private key to ppk format
- Open puttygen
- On the top menu, click “Conversions” and then “Import”
- Select the private key (e.g.,
id_rsa); enter the “Key passphrase” and “Confirm passphrase” fields if provided when generating the key, - go to File and click “Save private key” to save the key to disk in PuTTY format (as a .ppk file)
SCP - Secure Copy
Use SCP to tranfer file from a computer or laptop to RPi.
The SCP client application needs to be installed on the laptop.
Example, to copy file domain.crt to RPi host 192.168.1.134 for pi user
and store it at the home directory:
scp domain.crt pi@192.168.1.134:
For Windows computer, download and setup the free Windows SCP Instructions:
- Open WinSCP
- On the “Session”
- File Protocol = SCP
- Host name:
- Port: 22
- User name:
- Password:
- Setup Tunnel otherwise WinSCP will fail to connect and it will
keep trying and slowing down the computer network;
- Click Edit to enable “Advanced” button; in the “Advanced Site Settings”;
- On the left-hand nav, click Connection - Tunnel, setup the following:
- Check “Connect through SSH tunnel”
- Enter
hostname,port,usernameandpassword
- [Optional] Setup SSH key for connection without username/password
- Click Edit to enable “Advanced” button; in the “Advanced Site Settings”;
- On the left-hand nav, click SSH - Authentication, setup the following:
- Enter the “Authentication parameters” - “Private key file” (
id_rsa.ppkorid_rsa); WinSCP needs Putty formatted private key,id_rsa.ppk, but it will take and convert the OpenSSHid_rsaprivate key file to the Putty format automatically. - On the left-hand nav, click Connection - Tunnel, setup the following:
- Enter the “Tunnel authentication parameters” - “Private key file”;
enter the
id_rsa.ppkfile, the same one used for the authetntication above - click OK
- Click “Save”
Source: Secure Copy
Other methods to connect to RPi
- Connect Your Headless Pi to a Library WiFi Network
- Need USB-to-Serial cable, and know how to connect to RPi serial pins;
- need to preinstall command line browser w3m
- need wifi ssid and passphrase (if not public); otherwise scan the ssid after making serial connection to RPi as discussed below;
- after boot, use putty to connect serial to RPi
- [optional] scan for wifi ssid
sudo iwlist wlan0 scan - connect to wifi; use
raspi-configif it works on the putty serial terminal, otherwise modify the wifi config file,/etc/wpa_supplicant/wpa_supplicant.confto add additional wifi network and restart the wifi or reboot RPi:network={ ssid="<replace_with_ssid>" key_mgmt=NONE scan_ssid=1 id_str="networkName" } - to run w3m to accept wifi terms of use
w3m https://www.google.com/ - find the assigned ip address to RPi, so that can connect using ssh
- if all goes well, disconnect the serial connection and continue working with ssh terminal
- Connect to laptop Mobile hotspot
- Need USB-to-Serial cable, and know how to connect to RPi serial pins;
- On Windows 10 - Search, type
network status, and select the match to open the “Network Status” screen - on the left navigation, select Mobile hotspot
- on the “Mobile hotspot” screen, slide to “on” the “Share my internet connection with other devices”
- feel free to revise the network name if too long or complicated
- also feel free to revise the auto-generated password
- on the RPi, use
raspi-configto connect to the wifi; the wifi info will be saved to the wifi config file,/etc/wpa_supplicant/wpa_supplicant.conf - [alternative] modify the wifi config file,
/etc/wpa_supplicant/wpa_supplicant.confto add additional wifi network and restart the wifi or reboot RPi:network={ ssid="<replace_with_ssid>" key_mgmt=NONE scan_ssid=1 id_str="networkName" }
Useful commands
- Info
info
Output:
File: dir,      Node: Top,      This is the top of the INFO tree.

This is the Info main menu (aka directory node).
A few useful Info commands:

  'q' quits;
  'H' lists all Info commands;
  'h' starts the Info tutorial;
  'mTexinfo RET' visits the Texinfo manual, etc.

* Menu:

Basics
* Common options: (coreutils)Common options.
* Coreutils: (coreutils).       Core GNU (file, text, shell) utilities.
* Date input formats: (coreutils)Date input formats.
* File permissions: (coreutils)File permissions.
                                Access modes.
* Ed: (ed).                     The GNU line editor
* Finding files: (find).        Operating on files matching certain criteria.
[...]
- Disk Usage
Disk usage; -h - human readable; -s - summary;
du -hs
Output:
48k
Disk Free
df -h
Output:
Filesystem      Size  Used Avail Use% Mounted on
/dev/root        30G  1.4G   27G   5% /
devtmpfs        428M     0  428M   0% /dev
tmpfs           433M     0  433M   0% /dev/shm
tmpfs           433M  5.9M  427M   2% /run
tmpfs           5.0M  4.0K  5.0M   1% /run/lock
tmpfs           433M     0  433M   0% /sys/fs/cgroup
/dev/mmcblk0p1  253M   52M  201M  21% /boot
tmpfs            87M     0   87M   0% /run/user/1000
- RAM Usage
State of memory
free -h
Output
              total        used        free      shared  buff/cache   available
Mem:          864Mi        50Mi       740Mi       5.0Mi        74Mi       758Mi
Swap:          99Mi          0B        99Mi
Note: increase swap space
Cloud hosting of RPi
Cloud hosting of Raspberry Pi at: Mythic Beast
Troubleshooting
[Issue] Installing numpy
Installation of Error:
sudo apt update
pip3 install numpy
python3
>>> import numpy
Traceback (most recent call last):
[...]
ImportError: libf77blas.so.3: cannot open shared object file: No such file or directory
Setup:
- raspbian stretch (2019-04-08-raspbian-stretch)
- fresh install + docker (19.03.1, build 74b1e89)
Resolution:
pip3 uninstall numpy
sudo apt install libatlas3-base
sudo pip3 install numpy
Reference: